Well, it's been a crazy week but I'm finally back for those who were worried...lol... Just had a crazy busy week, I'm exhausted but I won't sleep until this post is finished! A little late is better than never, right?
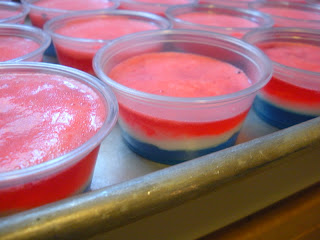
Call me insane but I just had to make these red, white and blue jello shots for the fourth! I got my inspiration from http://www.thecollegetownlife.com. They have so many different shots to celebrate the holiday, I modified the white layer, instead of using milk and knox, I used cool whip. Yum!
Click Read More for the How To...
2 boxes (3 oz) cherry Jello
2 boxes (3 oz) blue raspberry Jello
2 tubs of Cool Whip
50 (or so) clear plastic ramekins
2 large cookie sheets
Cherry Vodka
2 1/2 cup measuring cup
Whisk
Gallon size Ziploc Bag
How To
1. Line cookie sheets with clear ramekins.

3. Add one box of blue raspberry Jell-O to hot water and use whisk to mix until dissolve.

4. Add one cup of Cherry Vodka and stir.

5. Pour into ramekins, remember to leave enough room for the two other layers.

6. Repeat steps 2 - 5 for the second box of blue raspberry Jell-O and fill the remaining ramekins.
7. Place in refrigerators until completely gelled.
8. Add thawed Cool Whip to a Ziploc bag and cut a corner off, squeeze into ramekins. This is a bit tricky. Freshly cleaned fingers may be used to spread the Cool Whip. Making sure that the Cool Whip is really thawed will help. Make sure that the Cool Whip touches the sides of the ramekins and the layer is as even as possible.


9. Place sheets in the freezer, if possible or refrigerator if need be.
10. Repeat steps 2 - 4 for the Cherry Jell-O. Note: Do not repeat step 5 just yet. Place Cherry Jell-O in refrigerator to cool for approximately 15 minutes before proceeding.


12. Return trays to refrigerator until completely set up.
13. Serve and enjoy!
No comments:
Post a Comment