So I had this idea... I love all the button crafts out there and I wanted to bust out the old embroidery equipment and dust it off. That is where my story for you begins... I loaded my Generations (embroidery digitizing software) on my computer only to find that the old software doesn't work on the new 64-bit operating systems. OMG! I know that my software is 7 years old but it was not cheap! Well, surprisingly, that was easily rectified by calling the software company and they sent me links to update my software to the new, latest and greatest. Yeah! I was in business, so I thought. Well, then, I have this little Mini Magic Box that takes my designs and puts them on a card that I can in turn put into my sewing machine and Presto! Embroidery Time! Well, NOT SO MUCH, my little Mini Magic Box does not have an update to work with 64-bit operation systems such as Windows 7. Well, I took trip to the local sewing store and found that I can rectify this new situation by buying a new box for a mere $150, yikes! Maybe next week I can invest, it needs to be ordered anyway. Well, I busted out the embroidery equipment anyway. I was limited to only use the pre-installed designs on my sewing machine. Not what I wanted, but it will do for now. =)

How I Did It
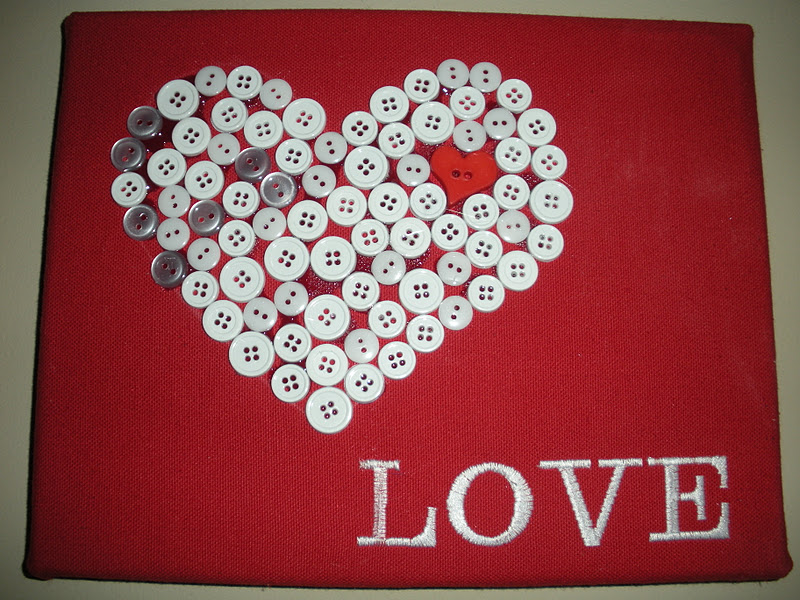
1. I cut a piece of red fabric (I bought some red canvas like, but thicker fabric) larger than my 8 x 10" canvas that I planned to attach it to and set my machine to embroider 'LOVE'...


2. I took my purchased 8x10" canvas and laid out the piece on fabric with 'LOVE' in the lower right corner.


3. I folded the bottom edge under, keeping it tight so that I would be able to turn the canvas and fabric over, keeping the design in the correct location.

4. With a hand staple gun, I stapled the fabric on each side lengthwise on the under side of the wood canvas frame. I did this to stabilize the fabric so that the design would not shift.

5. I trimmed the access fabric.

6. I stapled each of the corners, folding over and pulling tight.

7. I continued to staple the sides, one at a time, paying close attention to the corners, folding and pulling tight.


When finished...

Corners aren't perfect but I can live with it.

9. I traced the heart onto the fabric with a tailor's chalk pencil.

10. I glued buttons using fabric glue, especially for fabric embellishments. I found a great heart shaped button at the fabric store over the weekend that I thought would be a great touch! This was actually a bit more difficult than I had originally thought, it's hard to get these buttons to fit together without having large gaps in between.

Viola!

No comments:
Post a Comment