
Once a Cardinal, Always a Cardinal...
That is Steel's School Motto. He didn't win the costume contest at the Boo Bash at the school but I think he should have. Have you ever seen such a cute cardinal? The tutorial isn't the greatest because I really winged it and just kept making Steel try it on to measure, etc.
Click Read More for the How To...
Hooded Red Zippered Sweatshirt
Red Sweatpants
Red Feathered Trim (I used less than 1 yard)
Stiff Black Felt
Stiff Yellow Felt
Black and Yellow Thread
Sewing Machine
How I Did It
I made Steel try on the sweatshirt well over a dozen times for measuring! He was a good sport. Thank goodness because I needed to get measurements often!!! It was quite difficult. I don't have good measurements and all kids will be different.
1. I cut a piece of felt that was long enough to cover his eyes and opening of the hoodie and have enough length left on either side to be sewn onto the hoodie for the blacks of cardinals eyes.

2. I folded the piece in half and cut the shape of cardinals eye black using google images as guides.


3. I cut 2 triangles out of pieces of yellow felt. I made sure that the short ends fit nicely across the eyes.

4. I sewed the two pieces of yellow felt together to form the beak. (Yellow thread)


6. I folded the beak and eye black back in half and cut out eyes. Circles didn't work out too well so I made teardrop shapes.

7. I sewed the eye black to the top edge of the hood. (Black thread)

8. Once I had that set, I sewed the entire edge to the hood that was not part of the face. (Black thread)


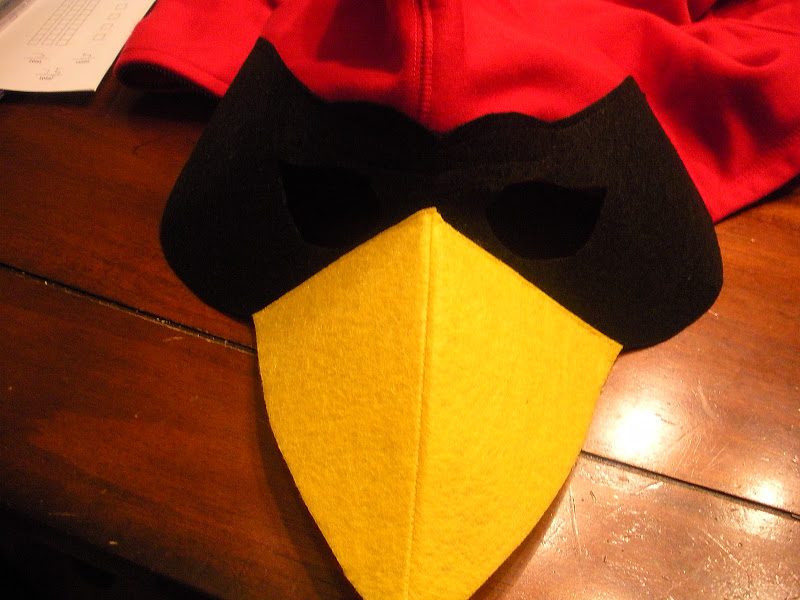


9. I tried the black underneath the beak.

10. I sewed the trim onto the arms of the sweatshirt. I did think by putting the arms onto the arm of the sewing machine. This proved to be difficult but I got through it. I just tacked every half inch down the entire arm.


The finished results. Sorry the tutorial isn't the greatest but for those with a little experience will get the point.


No comments:
Post a Comment