Showing posts with label Fall. Show all posts

Thursday, November 15, 2012

Fall Ribbon Wreath - Revisited


I had to re-post my Fall Ribbon Wreath that I made last year.  I love it.  Check out the tutorial here.

Thursday, November 8, 2012

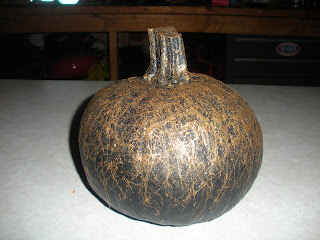
Spray Painted Pumpkins


I experimented with my small arsenal collection of spray paint that I have stored out in the garage.  

Pre-painting:


Pumpkin #1:

Unpainted Pumpkin =


  =


Pumpkin #2:

Unpainted Pumpkin      +     =

 + =


Wednesday, November 9, 2011

Fall Ribbon Wreath


I picked up a bunch of ribbon at a 50% off sale at the craft store.  I've always wanted to make a ribbon wreath and now was the time.  It's great that you just wait a couple weeks into a season and everything goes on sale.  It's better when you can wait until the season is over, but I couldn't.  =) 

Materials
Large array of ribbon, all sizes and colors (I chose fall colors.)
Floral Hoop
Dritz Fray Check, see Keep Fraying at Bay


The How To
1.  Starting with the widest ribbon first, cut into approximately 18 inch lengths and tie bows around the floral hoop.  Make sure that you space the colors out.  My floral hoop had 4 individual wires around it, I paid special attention to stagger my bows, moving inward then outward.  Please make note that the bows do not need to be pretty or fancy in any way.  You will have so many bows that they overlap and you will not be able to tell if they are pretty or ugly.


2.  Make sure to use Dritz Fray Check, see Keep Fraying at Bay, as you go to keep ribbon from fraying.  It is much easier to use it as you go instead of at the end, you will have too many ends to tend to at the finish to make sure you have them all.


3.  Continue tying bows and filling in the hoop.


4.  Once you get to the smaller width ribbon, cut them slightly shorter than the wider ones, approximately 12 - 15 inches in length.  Tie them to the floral hoop by making double knots.  You do not need to tie these into bows.  Continue spacing the ribbon around the hoop.


The finished product:


I haven't decided whether to trim the longer hanging ribbon or not.  I kind of like it but it kind of bothers me as well because it is not symmetrical.  Hmmm...  Must think about it...

Monday, October 17, 2011

Leaf Candle Holder


I got the idea from 5 Orange Potatoes.  I think there is something wrong with the link.  There is a picture but no instructions.  It's a cute idea.  Steel was collecting leaves at Gramma and Pap's house and we were going to use them to create this.  However, I did not press them in time before they started curling.  I stole some more leaves from the neighbors yard.

Materials
Glass Jar (I reused a pickle jar)
Leaves
Mod Podge - High Lustre will work the best

The How To
1.  Collect some freshly fallen leaves.
2.  Press and Dry leaves.
I am lucky enough to have a flower press that was purchased for me by my mom.  You can just press them inside a book or a homemade press.  I left them in the press for 2 weeks, mostly because I was busy with a certain birthday party...but I think a week should be sufficient.  You could always keep checking on them until they are ready...


2.  Make sure your jar is free of the old label.
3.  Begin gluing leaves to jar, overlapping with mod podge.
4.  Using the mod podge, paint a clear cover over the entire jar to create a seal over all the leaves.


5.  Let dry.
6.  Insert tea light, real or battery powered.  I used a votive that was in a votive holder since I had one to use.


7.  Display.  Can even be used to line walkway.